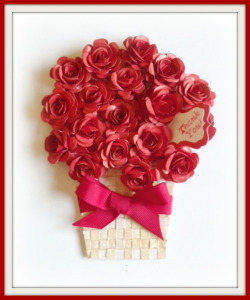
Valentines Day is tomorrow and I don’t know about you but I’ve been dreaming about getting a lovely basket of lush red roses from my dear husband. Hopefully he will see this post and oblige (ha ha ) but in the interim I thought I would make do with my home-made basket of roses – in a card.

I know you’re thinking – is that a card??? It certainly is! It’s a card made out of card stock, glitter strips and ribbon so basically I don’t really need a basket of actual roses, this should certainly make do! Here’s a look at the card from another angle.

Wondering how I concocted this creation? I am happy to say that I filmed ‘the making of this card’ so you can see first hand how I made the project in the video tutorial below. The woven basket of glitter strips isn’t complex at all, watch the video and you will see a really quick an easy way to do it. And all those roses – they’re made from the ItsyBitsy Swirly Rose die. It’s really a great investment because you can make all the roses you want in the color you want. Plus I have provided a close detailed view of how I made that bow so watch on!
I am also providing a template of the shape I used for this card. The size is approx 4.25″ by 6.25″ but you can enlarge or reduce as you require.
I hope you enjoyed this post and the video. Now all that’s left is for my husband to get me the real stuff! Cheers!
Template of the Card Shape:

Supplies Used:


Your creation is just ….. Pls fill in the blank with all the words that are synonymous to stunning, beautiful, mind blowing, 'wow'.. I have a poor vocabulary Sunehra… Your husband is gonna ADORE it… A humble bow to you..
Sunehra!! this is simply awesome!! I cannot stop admiring it!!
Wow Sunehra!! This is so beautiful!
Wow…Such pretty roses and Sure to bring about bountiful joy, happiness, cheer from ur hubby 🙂
Oh wow!! this one is a stunner for sure …gorgeous ..gorgeous roses and the basket made from the glitter strips is such a Fabby idea …loved this to bits Sunhera 🙂
Hey thanks SO MUCH Sindhu! It was real fun to make too 🙂
Hey Berina, so glad you liked it. Lush and bountiful…
Thanks so much!!
Hey Sathya… thanks so much.. let's see about the cheer… haha
I know right!! I had these vintage strips sealed in the packet for the longest time and then when I wanted to make the basket, it was like VOILA! Thanks so much Hussena
WOW Sunehra a shaped card , weaving and gorgeous roses all rolled into one and what a winner. It was intriguing seeing you make the rose. Using the daisy die I rolled it the other way..somehow didnt get the desired effect when I rolled it from the periphery in as you have shown! Did you try embossing it and then rolling to cut short the curving step ? Just curious..
Oooo… I love love love this one… I loved the idea of this die too.. for now I dont have a bigshot, but i'm gonna buy this die and be happy when i own a big shot!! 🙂 so pretty gorgeous…
Wow! This is gorgeous.The woven basket, roses and bow…everything is perfect…and thank you so much for the video tutorial 🙂
Hey thanks for your comment. I don't have the daisy die so I don't know. But this one starts larger from the outside and smaller inside so you have to roll from the periphery. Regs your question – embossing first? Embossing how? At best perhaps I could have the done the curling before rolling it, might save time.. do elaborate…
Manu – I ALWAYS marvel at the fact that you don't have a cutting machine, big shot or otherwise… The stuff you create without it is amazing… so glad this die appealed to you.. it is a useful piece.
Hey thanks so much. Glad you enjoyed it 🙂
Sunehra..in punchcraft we emboss a punched flower's petals using a rounded tool like in this post
Paper flower tutorial or in this
Paper flower tutorial 2
and yes that is what I meant did you try curling/embossing before rolling ?
This is so gorgeous..:)