


I dismantled the frame and the backing ply .First I took the frame and applied Mont Marte modelling paste and Little Birdie stencil which I got from the store. Also randomly laid some modelling paste with knife and sprinkled some long glass beads. As modelling paste has very good adhesion try and lay down stuff when it is wet so that no glue is needed. Once dry, I applied black gesso. (Mont Marte) again from the store. http://itsybitsy.in/modelling-paste-mpa0041-500ml-tub-mm

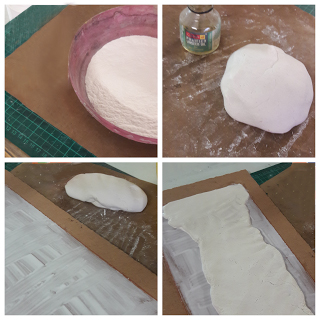
Now was the time to create the main project. For this I wanted to try the embossing method to create a textured look. This technique is widely used and is popularized by Paul Bozzo. I made clay with marble powder and PVA craft glue as my efforts at using joint compound or wet putty were not very satisfactory. I pasted the clay in an even fashion on the board….
Please refer pictures for clarity.

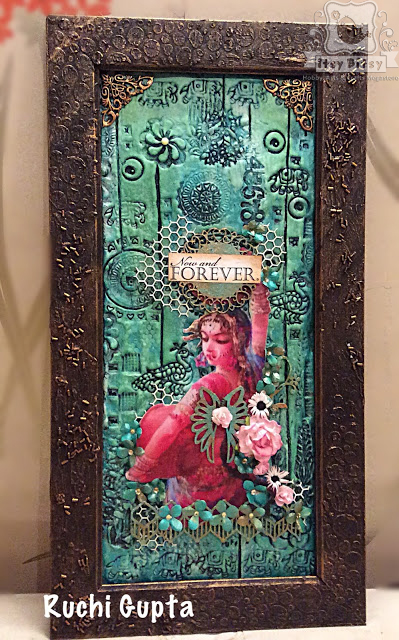
Next step was to color the project. Leave the marble clay to dry for at least 12 hours before you start doing anything on top of it. I was quite eager to open the little jars of metallic colors and yes was not disappointed!!!. They were creamy and very smooth. Also they were thick enough to stay on the brush and not drip.The shine on these was excellent. I specially recommend the three colors I have used if you want patina effect or are thinking of shimmery upgrades to your projects. Layer your color alternating with a coat of gel medium to seal the layers. Start with the light shades and move to dark. I used lime crush and followed by Caribbean Teal and finished with Burnt Umber (acrylic +water)wash. Rub off excess paint before it dries.


thick cardboard with glue and used Acrylic gloss medium to seal it. I decided to paint some papers with the same colors and made small flowers from them. Also all the chipboards were treated with the same colors. Think results speak for themselves as the patina effect comes out beautifully.


Now comes the placement of all elements. Do a dry run by placing things and adjusting how you like them. I used silicone glue by Itsy Bitsy to paste all embellishments and double sided tape for the cutout. This is the final output and I am glad with the richness of colors. Hope you enjoyed and would try out these colors.


It’s awesome. Love the effect of tinted little birdie Metallica.
thanks so much.Happy that you liked it.
You’ve really imsersped me with that answer!
Wow it’s awesome,loved it so much love the background u have created well explained tutorial too☺
Thanks dear Pooja for always supporting me.Huggs to you.??
The Patina effect is gorgeous & the embossed effect is fabulous! Thank you for doing a stunning job with the metallic paints Ruchi!
Thanks so much for appreciating.I am happy that you offered me the chance to work with the metallics.I am naturally more fond of metallic shades and this product is a sure winner⛤⛥
Woo awesome ruchi ji dear ,grt job ,all well placed
Thanks dear Mamta..happy that you enjoyed the tutorial.?
Gorgeous gorgeous gorgeous! You are such a star, Ruchi! Thanks for the tut too!
xx
Suchi
Absolutely first rate and cooepr-bpttomed, gentlemen!
Thank you for share this. I’m looking for water bottle. That’s why I’m here. In case you have any idea regarding this, please show to me.