
Let’s see how Megha feels about being featured in the ‘Crafter in the Spot Light”
Megha Handa: Hi beautiful people! I am Megha Handa. I am a post graduate in marketing and international marketing. I was born and brought up in Ludhiana (Punjab). I belong to a business family and fortunately each member of my family is an artist in their own way. So I have been really lucky and grateful because I had the freedom to do whatever I wanted to do. Yes, I am glad about the fact that my certificates of merit in art and crafts are way more in number than in academics?.
MH: I have always been curious about learning new things since childhood! Art and craft classes in the summers fascinated me more than anything else. Moreover, I am more than blessed to be a student of a school which had a separate class allotted for different hobbies and yes mine was art and craft without any doubt!! Apart from that, I feel I have got it little bit in my genes as my dad designed garments at our unit and mom was equally fond of different stitching techniques, she made some really beautiful wall decor pieces with stitch craft.
MH: Right now, I am really fond of stamping! I just love their versatility…. imagine you can do so much with them starting from a home decor piece to a simple card. It’s so much fun doing stuff with them. ❤
MH: Frankly I am in love with all Itsy Bitsy products; they are absolutely value for money!! But there are some specific ones which I always keep a stock of because I just can’t do without them. They are Little Birdie Chalk Paints, Colour Splash and Little Birdie flowers . And yes, I am a big fan of the stencils too. They surely come in the list of…. Must haves! If I don’t name a product in my list of favourites, that’s because I am yet to use them ?
MH: If I had magical powers, I would start my own craft channel on television where different crafters can have their own shows and yes it would exclusively run advertisements only of craft stores!!
MH: Prized possession … Mmmmmm ….It will be unfair if I name one, all products from Itsy Bitsy are my treasure. I love adding up to this treasure every now and then.
MH: My style of crafting … Okay in my words I would say clear, simple and elegant. I try to put a theme in all projects of mine. I focus on giving my projects a classy look adding lots of colours and flowers , but I make sure that the colour are in sync with one another or I try giving Ombré effect to many of the projects I do .
MH: They say… crafting is a way of life, so any day when I don’t do something creative… is a day wasted. I usually do household chores during the day and it is at night I get time for what I love. So it’s around 4 hours I spend crafting each day. I feel it rejuvenates my soul and energizes me.
MH: I would just say don’t limit yourself and don’t wait for the right time, always remember right time is NOW. Just do what you want to do with whatever resources you have. The universe is here to support you in whatever you do, just be positive and the universe shall make a way.?
MH: My favourite quote is – Do what you love and love what you do! Respect yourself and respect your work ? Craft your heart out – you may not notice but we usually make something similar to our patterns of life!
I love stamping , so I thought of creating a canvas with it . I will show the detailed step by step procedure and I am sure you are gonna try it for sure .
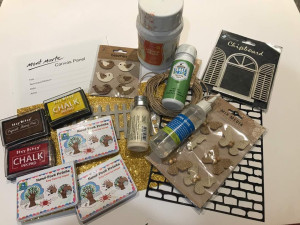
So here are the supplies from Itsy Bitsy that I will be using

Step 1
Apply an even coat of gesso on the canvas and let it dry . But if you get super excited just like me to complete the project, heat gun comes to rescue!! Yes, you can always use heat gun for faster drying !


Step 3
Now that the base is ready its time to do the most amazing part of the look ! So stamps and stencils are going to be the heroes of our project . I took everyone’s favourite brick stencil and kept it on the edge of the canvas and dabbed Itsy Bitsy yellow chalk ink on it diagonally, similarly I did with orange, red chalk inks, and finally the brown shade with Itsy Bitsy brown pigment ink .
NOTE – Remember to adjust the stencil or else it will show a line


So now that our Window is ready , I took a glittered foam sheet I bought from thestore and cut a heart out of it so that it nicely fits into the gate. And then i took a cardstock and cut something measuring exactly the size of the inner part of the window. Then I pasted them as shown in the picture.


Step 6
Now I took another favourite from my collection, the fence chipboard, trust me, I love them so much that I always have an excess stock of them. I cut it little smaller and distressed little bit with the brown pigment ink. Then I pasted the window and the fence with Texture Tack for the simple reason that I love its sticking power !


NOTE : Make sure that you stack it in a way that petal from every flower alternate each other and do not overlap .


Step 8
Now I dabbed the leaves with light green colour and then distressed them with a darker shade of green. These ink pads from the store are so amazing and so juicy that you cant resist using them .
NOTE – These inks wash easily with water so do not forget to put varnish spray .

I tied the jute cord over the top of the window and added some birdies again from the naturals collection.


You will receive Rs.500/- Itsy Bitsy gift voucher ?? & a Crafter in the Spotlight badge, which can be proudly displayed on the side bar of your blog and other platforms. Looking forward to many more creations, Happy Crafting!
U deserve ever bit of it dear gal ! A long long way to go ? I know art is ur therapy . Never let it go . Stay blessed .
Lovely Creation congratulations