Hi friends,
Gopi Shah here today at Itsy Bitsy’s blog as a guest DT. Really happy to be back !!
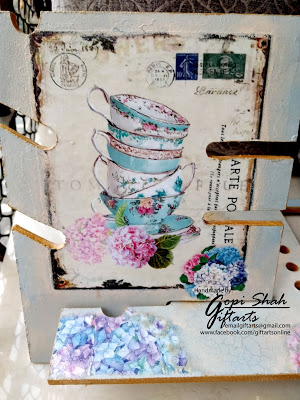
Today I will share a Decoupage project on a MDF Desk Organizer using various Little Birdie and other products from Itsy Bitsy.

Here is a step by step procedure you can follow to create your own decoupage project.
To begin, I have used a MDF Desk Organizer from my stash. Firstly, sanded the MDF base with a sanding paper (available locally at any paint shop) and then applied a generous coat of Little Birdie Acrylic Gesso – White all over the MDF base.While the gesso was drying, I cut and prepared the decoupage paper. I have used Decoupage Paper A4 4sheets – Post Perfect from Itsy Bitsy. To cut the decoupage paper, I never use scissors. I always apply water on the paper using a thin paint brush, little away from the edge of the design that I want to use. Then, I carefully tear it along the wet area. This gives a fibrous look at the edge which later blends well with the colours.
Once the gesso was dry apply, I applied a generous coat of Little Birdie Decoupage Glue – Matte and adhered the decoupage paper when the glue was semi dry.
I always lay down the paper starting from one edge and gradually keep rubbing the paper onto the glue from center towards the outer direction till I reach the end. This helps in releasing the air bubbles trapped in between. After the first coat of glue was completely dry, I again applied a coat of decoupage glue over the paper and let it dry well.
I you are thinking, how do you make sure your decoupage glue is completely dry?well the answer to this question is,1. When you touch the surface, it should not be sticky and moist. If so, then it is still not completely dry.2. If the coat of glue looks milky then it is not completely dry. 
At the back of the Desk Organizer I have filled the blank space by stenciling. Applied, Little Birdie Mixed Media Paste 2 In 1 –White using a palette knife through a Damask stencil (from my personal collection). You can dry the stenciled area using a heat gun but I prefer natural air drying over heat gun drying.

Now is the turn to merge the decoupage paper with the base. I did this using Little Birdie Home Decor Chalk Paints. These are excellent paints just perfect for decoupage. I have used Rainy Day, Butternut Squash & Fortune Cookie. Using a sponge blender I dabbed these paints and cover the entire MDF base. Blended the paints wherever required and merged the decoupage paper to the base. As my decoupage paper has fibrous edges, it is very easy to hide & merge them with the chalk paints.
I have painted the edges of the desk organizer with Mont Marte Dimension Gold Acrylic paint. I personally prefer to paint the edges using my fingers but you can always use a flat brush. Highlighted the stenciled motif on the back of the organizer using the same gold paint and dry brushing technique.
To give it an extra touch of creativity, I have used Little Birdie One Step Crackle Medium at some places. You can totally skip the step if you wish to. While using a Crackle Medium, there are few things one should keep in mind.
1. The thicker the crackle medium coat, the bigger the cracks; the thinner the crackle medium coat, the smaller the cracks.
2. Depending on the direction of the brush strokes, the cracks would develop, i.e. if the strokes are vertical then you will end up getting vertical cracks and same way for the horizontal strokes.

Once the paint was dry it was time to seal the decoupage work. Applied a generous coat of Decor Varnish Matte to seal and protect the work from dust. You can also use Decor Varnish Gloss for a glossy finish. Lastly sprayed my project with a clear lacquer sealer (available at local paint shops) to make it water proof.
Tada!!! The Decoupage Desk Organizer is now ready for use.

I hope you find this tutorial interesting…. Do share your creations with us.
That’s a fabulous make! Very thoughtfully made.