Hello everyone. DT member Vidhu Thareja here on the blog today with new inspirational project which I have created using Filament Decoupage Papers.
As you all know the blog challenge #30 is about “Anything goes with Filament Decoupage Papers”. Believe me this is the best decoupage paper collection available till now. These papers give a feel of rice paper and are suitable for any type of base. 60 gsm makes them perfect for fussy cutting or hand tearing. These papers are a must have for all decoupage lovers. Now you don’t need to worry about wrinkles or bubbles any more. These papers are very easy to use and give flawless finish.
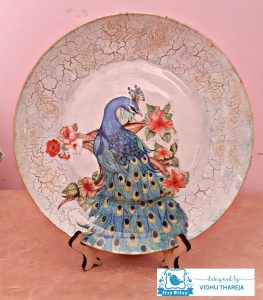
Filaments Decoupage Papers are so beautiful that it is very difficult to choose from the 21 designs. What I loved the most about these papers is their Indian ethnic prints which are hard to be found. The festive season is approaching and as I personally love to gift something handmade and exclusive to my loved one, so I have designed a reverse decoupage glass plate using one of the designs from the filament decoupage papers. Before going through the step wise tutorial, have a look at my project.

I had a clear glass plate of 9.5″ dimension in my stash. Clear glass plates are available at Itsy Bitsy too. It is very important to clean the glass plate first and dry it thoroughly to get rid of any dust particle or finger impression. To clean the plate I have used rubbing alcohol which is easily available at local pharmacy shops. Now it is my turn to select the paper for my project. My decoupaged projects are incomplete without a peacock design. I feel fascinated when I see peacock designs and just cannot resist myself from buying them So for this project also I have used one of the beautiful Filament Decoupage Paper ‘ Peacock Garden’.

These papers come in set of two coordinating A4 sheets which give us the freedom to design our projects in unique ways. You can use the single sheet as it is or can use single motif. I wanted to decoupage in the center only, so I have used only a single peacock motif. These papers are single layer papers so they can be used directly like decoupage papers.
Since my base is glass and a blended finishing gives perfection to decoupaged projects so, instead of doing fussy cutting of the motif I have used the wet brush technique. Move the wet round brush of zero number around the motif and then carefully tear it with your hands.

Since this is reverse decoupage so I adhered the motif face down, using Little Birdie Deco Magic Glue – matte. Applied a thin even layer of glue, which was sufficient enough. If the glue dries in certain areas before you adhere the image, you will see visible strokes of glue so make sure that glue is wet in all areas as you adhere the image. Do not adhere the whole image in one go. Start from one end by applying glue on a small area. Adhere the image and press it to remove air bubbles. Adhere the image like this and after adhering the whole image, place any plastic sheet and press gently from inward to outward direction to get a wrinkle free finish. Leave it to dry.
Always remember that patience is the key of decoupage projects. After a few hours I sealed the decoupaged area with Little Birdie Decor Varnish and left it to dry. It is very important to seal the decoupaged area with decoupage glue and varnish so that when we apply chalk paint on top of decoupaged image, chalk paint does not seep through the image.

On the sides I wanted to give a crackle effect. On this project I have used Little Birdie One Step Crackle Medium. This medium works well on every type of base except fabric. Before applying crackle medium, I have done random stenciling with Artists Acrylic Colour- Antique Gold.

Tip : Always use stencil brushes to get crisp impression of stenciling. First secure the stencil with masking tape. Load very little paint on the tip of the brush and dab extra paint on a rag or tissue. Now dab the brush on stencil. Do not move the brush like you paint. Remove the stencil and let it dry. Always wash the stencil immediately after every use. I applied Little Birdie Chalk Paint – Snow on top of the decoupaged motif only, using sponge. On the sides I applied One Step Crackle Medium.

Tip : Use a synthetic brush to apply crackle medium. On MDF we should apply crackle medium in a horizontal or vertical direction but on a glass plate, we must apply in a circular direction. I have applied crackle medium in a clockwise direction. Formation of cracks depends on the thickness of crackle medium, so if you need bigger cracks apply a thick coat of crackle medium but do not over- stroke the medium and use dab method to apply crackle medium. Always leave crackle medium to dry naturally for best results. Do not use heat tool to speed up the drying. It takes 3-4 hours to dry, depending upon the room temperature.
Now it was the turn to highlight the cracks. In one step crackle effect technique we use two colours of chalk paints in combination to match the image. I prefer to use light colours to match the background colour of the paper. I applied Little Birdie Chalk Paint- Butter Milk with sponge on top of the crackled surface. Do not over-stroke the chalk paint. As soon as the chalk paint starts drying, you will see beautiful cracks. Let it dry completely. Always apply the chalk paints in the same direction as you have applied the crackle medium.

To fill the cracks we need to use another colour of chalk paint which we want to see through the cracks. I have selected two beautiful colors of Little Birdie Chalk Paints – Sailing Sky and Salsa Red. I applie both the colors with sponge and blended them together. Do not use brush to apply the colour. Use the same dry sponge to blend the colors. You can use single color or multiple colors, as per your choice.
Tip : Acrylic colors do not work well on glass or metal surface. It will start peeling off as soon you start sealing your project. I would recommend chalk paints for the purpose.

I like a neat finish at the back of the project too. Therefore I applied two coats of Artists Acrylic Color – Antique Gold with a sponge to give it a uniform finish and then rubbed Metallic Wax – Antique Gold on the outer edge of the plate. I left it to dry completely. It is very important to seal the paint with varnish. Here I have used Little Birdie Decor Varnish, available in Matte And Gloss both variants. It is a water based varnish and dries very quickly, even in the humid weather condition. Apply it with any synthetic brush and the brush can be washed under running tap water. Since this would be used as home decor so I applied multiple coats (about 3-5 coats) leaving enough drying time between each coat. Multiple coats makes our projects long lasting and they can be cleaned easily with wet brush. 
To hang this decor piece was a big question for me. No matter how strong is your adhesive, which you use to stick the hook on the back the plate can fall down. But now we don’t need to worry about this. Itsy Bitsy has multipurpose hangers available in two sizes – 8″ and 10″. These hangers are removable and very easy to fix. Decor glass plates are very safe to hang using these hangers. 10″ wall hanger is perfect for a 9.5″ plate.

My decorative plate is ready to adorn the wall. This is a perfect gift for the upcoming festive season.
I hope you liked my project and it has inspired you to create something unique and beautiful, using the pretty Filament Decoupage Papers. Do participate in blog challenge #30. We would love to see your creations.
I am excited to inform you that all these products come with a unique QR code!
Point your mobile phone at the QR code on the product & scan them to take you directly to our YouTube links where you can see how each of these products are used! Check out all our new products for QR codes in the future ( this will be either on the label or on cap of the bottle).
Use code VIDHU5 to buy any product at www.itsybitsy.in and get 5% discount on your total bill.
Explore, Imagine, Create!!
Vidhu Thareja
List of material used :


