Hello all, welcome to another tutorial by Itsy Bitsy JToday, we shall make a vintage themed box. This is an easy DIY and looks exquisite. It requires very less time and effort to be made and is a great gift. You will definitely treasure this art work.

Materials required:

Wooden decorable (ready box)
Embellishments of your choice
Acrylic paint
Metallic paint
Glue
Tissue paper
Painting brush
Method:

 |
| Step 1 – Crumple a few tissue papers and flatten it |

 |
| Step 2: Stick the tissue paper on the box with the help of Itsy Bitsy craft glue. Make the surface rough using your fingers |
 |
| Step 3 – Trim the edges for a neat finish |

 |
| Step 4 – Paint the entire box with black acrylic paint. This forms the base colour |
 |
| Step 5 – Dab the metallic colour on the box using your finger tip or a pompom (Do not press too hard) |

 |
| Step 6 – Dab the golden colour to add that vintage bronze effect |
 |
| Step 7 – Colour a chipboard embellishment in metallic gold. You can also decoupage it to add a glossy finish |

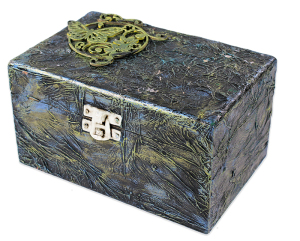
Our vintage themed decoupage box is ready. It has a rustic look to it and can act as a decorative piece. Let us know what you thought of this tutorial!! Happy Crafting J
Link to supplies:
Wooden decorable (ready box) – http://www.itsybitsy.in/store/index.php?main_page=advanced_search_result&search_in_description=0&zenid=dfsk0bv84h9e3r72rkn1dp68n4&keyword=Wooden+decorable
Embellishments of your choice – http://www.itsybitsy.in/store/index.php?main_page=advanced_search_result&search_in_description=0&keyword=chipboard
Metallic paint – http://www.itsybitsy.in/store/index.php?main_page=advanced_search_result&search_in_description=0&keyword=Metallic+paint
Beautiful…. And well explained tutorial 😀